The Lower Body Lock: How to Build the Same Handstand Position Every Time
Most handstand inconsistency starts in the lower body. Here's the two-movement system I use to create a locked, stacked position — and the drills to build it.
If your balance feels inconsistent, the problem is often lower than you think. The pelvis and the legs, in a position that shifts slightly each time you kick up and never quite settles the same way twice.
When the lower body isn't locked, you're not learning to stabilize a shape. You're learning to manage a different shape every time.
The EOM Point
I work with a concept I call the EOM Point, End of Motion Point. Instead of finding "somewhere around here," you find a specific end position, the furthest point of a given movement, and make that your landmark.
An EOM Point gives you three things at once:
- Consistency: end-range positions are much easier to hit reliably than mid-range ones. You know when you've arrived.
- Stillness: a position at the end of its range has nowhere left to travel. It naturally stabilizes.
- Stack: when applied correctly, EOM points layer the body into a clean vertical line.
For the lower body, we're working with two EOM points at the same time, and they pull in opposite directions.
The Two Lower-Body Forces
1. Posterior Pelvic Tilt (PPT)
The first movement is a posterior pelvic tilt. The pelvis rotates so the pubic bone comes forward and the tailbone drops down. You may have heard cues like "tuck your tailbone" or "close your hip angle."
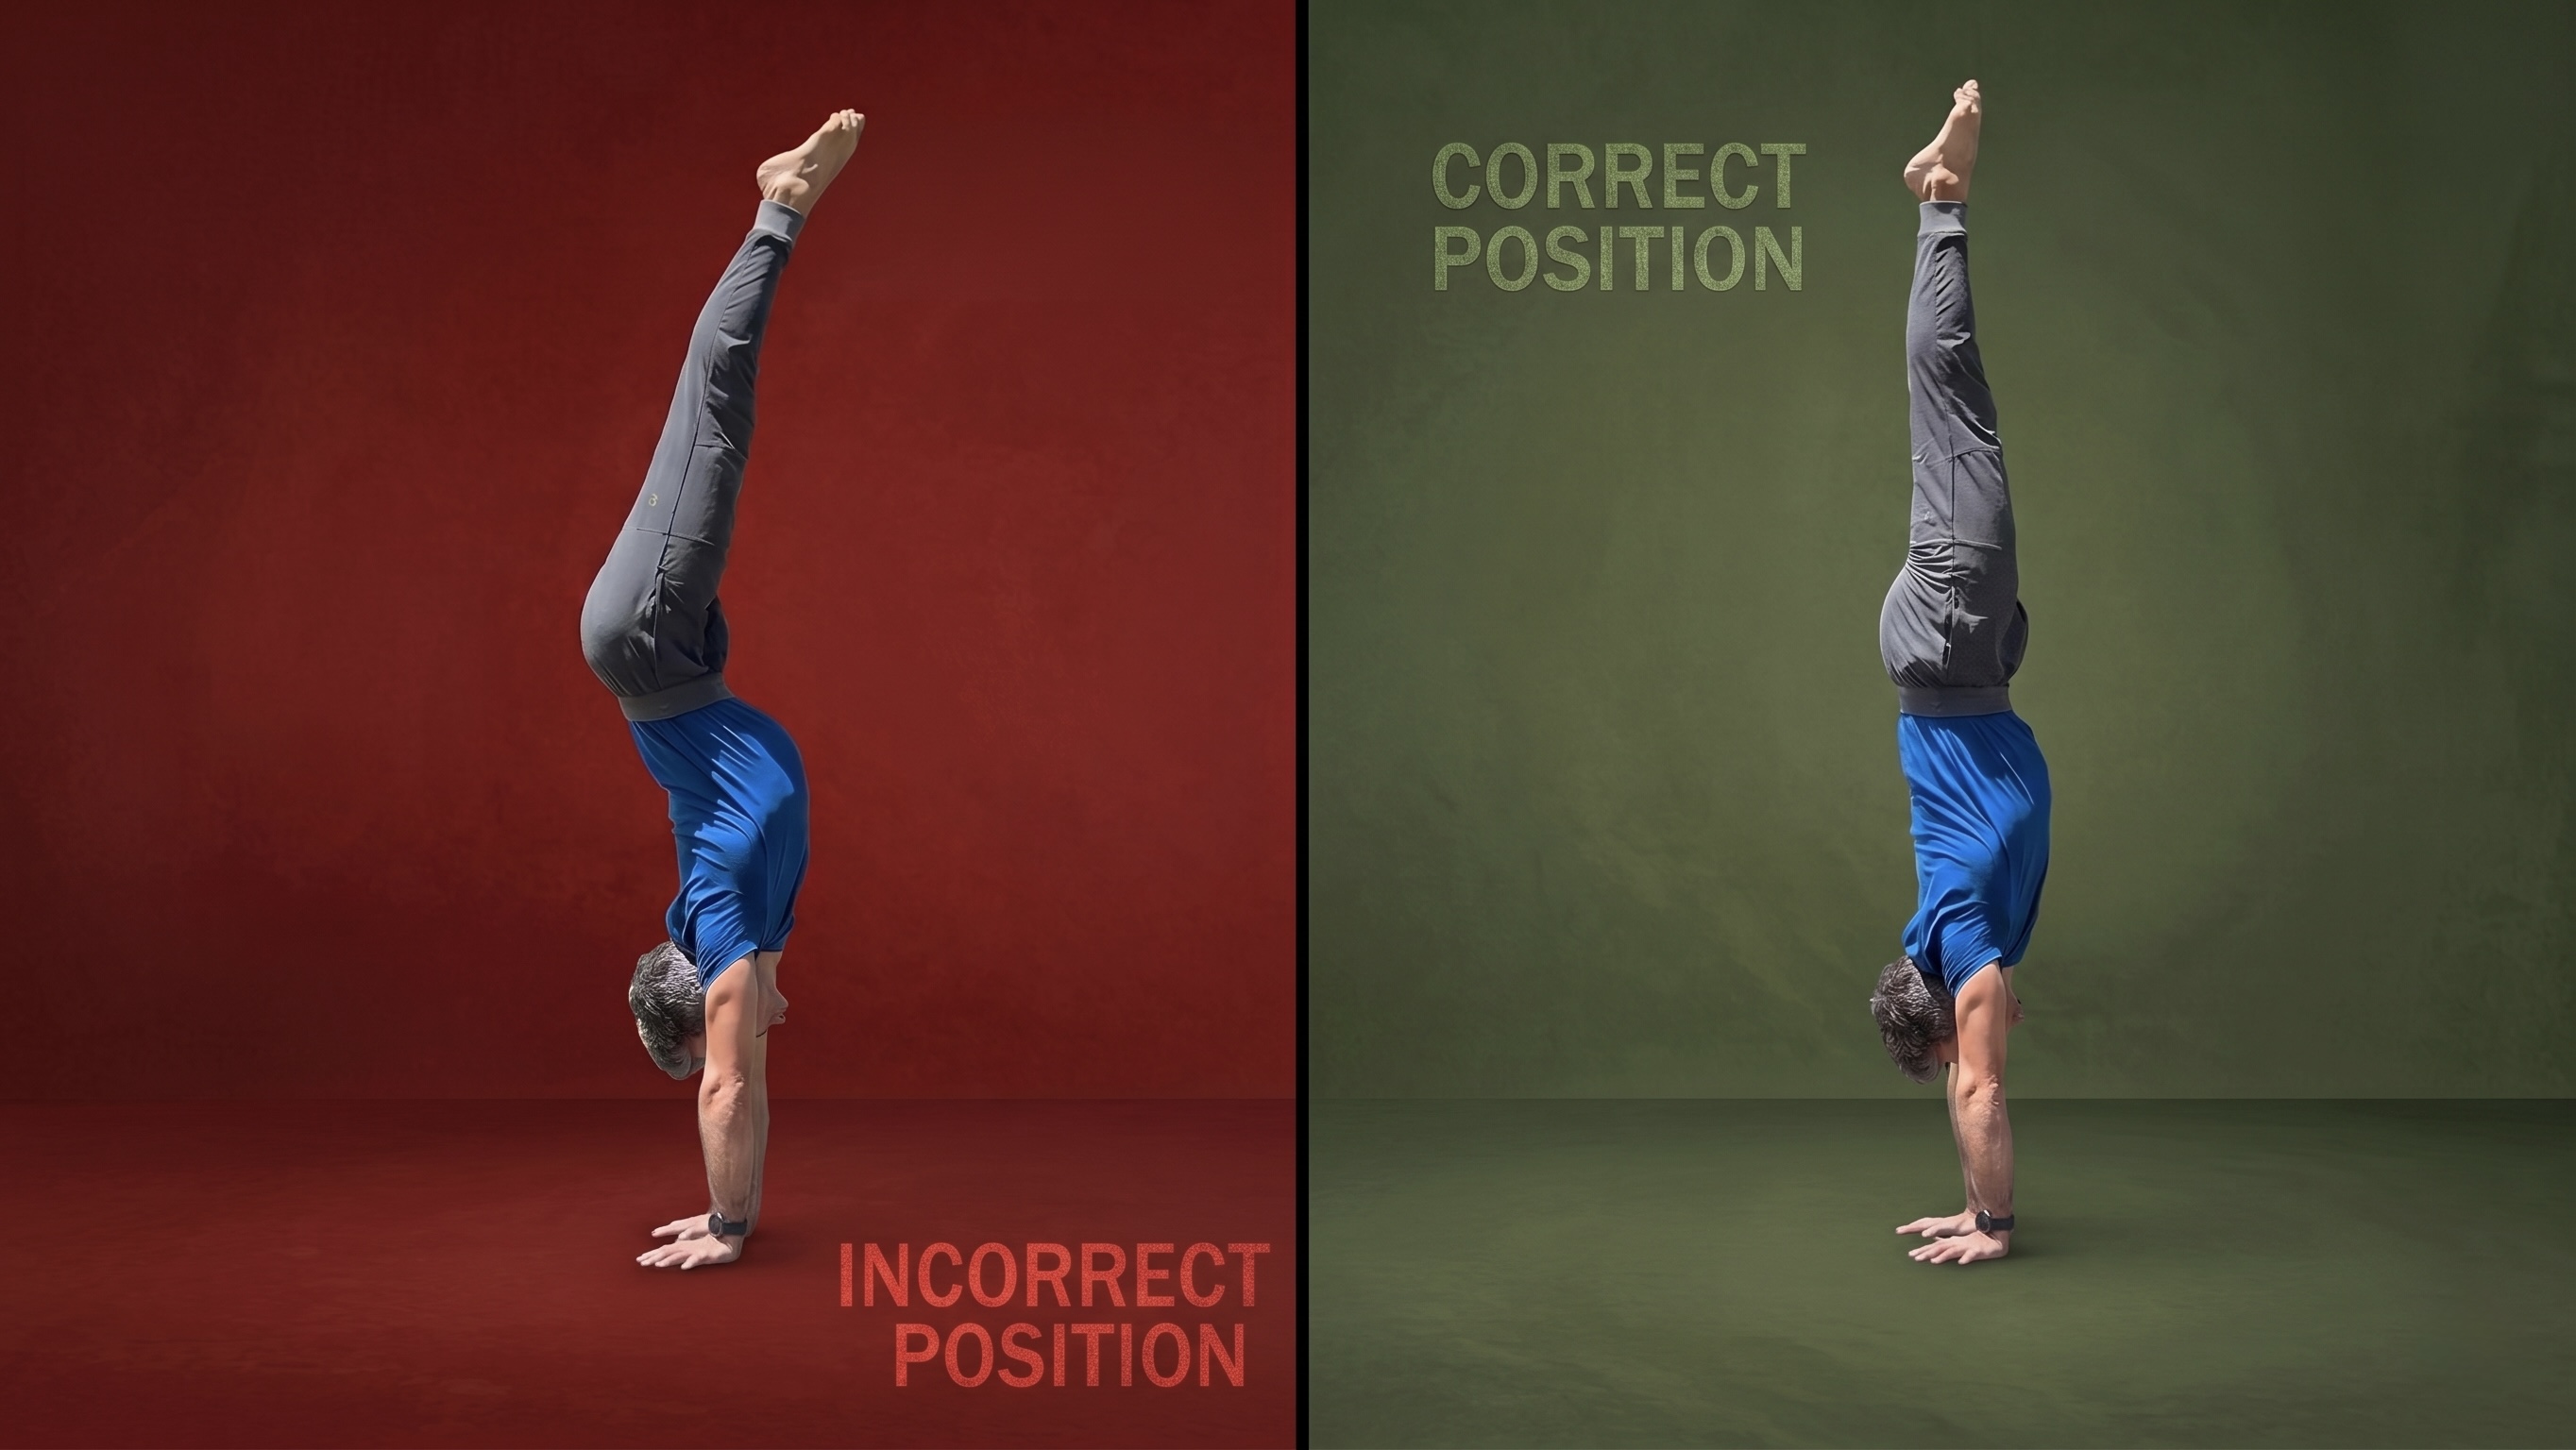
There's a detail most people miss: the tilt needs to happen in place. The pelvis rotates but doesn't travel backward in space. If the whole pelvis slides behind your spine while you tilt, you've traded one misalignment for another. The goal is a tilt that keeps the hips stacked directly under the ribcage, not one that creates a shelf jutting out behind you.
Think of it as rotation around a fixed point, not a backward slide. You go as far as the pelvis will rotate and stop there. That's the EOM.
2. Lengthening from the Foot
The second movement goes in the opposite direction: a full lengthening through the entire leg, leading from a pointed foot. You reach long through the toes, which straightens the knee and extends through the quad.
On the ground, gravity and the floor do a lot of this work for you. When you tilt the pelvis, the quads engage naturally to hold the standing position. In a handstand, that assist disappears. If you tilt the pelvis without consciously lengthening the leg, the knees will soften, the hips will close, and you'll drift into a partial pike.
In the handstand, leg-lengthening has to be intentional. You reach through the foot, extend through the leg, and let that extension work against the pelvic tilt. Two forces, opposite directions, creating one locked position.
Why Opposing Forces Create Stillness
This is the part that surprises people. Wouldn't doing two things at once add tension and make it harder to hold?
When two forces pull in opposite directions with equal intensity, they cancel each other out. The position doesn't want to move, because there's nowhere for it to go. The PPT pulls the pelvis one way, the quad extension pulls back in the other. Together they create internal stability that holds the shape from within, which is more reliable than trying to hold a position through effort alone.
Training It: Start on Your Feet
Before taking any of this upside down, get familiar with both movements while standing. The ground gives you feedback that disappears when you're inverted.
Drill 1: Wall Pelvic Tilt
Stand with your back against a wall, feet a few inches forward. Notice whether there's a gap between your lower back and the wall. Without using your hands, try to close that gap by rotating the pelvis until your lower back presses gently into the wall. That's your PPT. Hold it and feel where the hips want to shift. The goal is rotation without the hips traveling away from the wall.
Drill 2: Standing PPT + Pointed Foot
Standing freely, apply your PPT. Once the pelvis is set, lift one leg slightly and reach through the foot: point the toes, straighten the knee, extend fully through the quad. Feel both forces working at the same time, the pelvis rotating one way, the leg lengthening in the other. Hold 5-10 seconds per side, then switch.
Drill 3: Hollow Body Hold
Lie on your back. Press your lower back into the floor, that's your PPT lying down. Extend both legs out and point through the feet. Lift the legs to roughly 45 degrees and hold. The two forces become very clear here: the back presses down, the legs reach away. If the lower back lifts off the floor, you've lost the tilt. Find it again before adding leg height.
Taking It to the Handstand
Drill 4: Chest-to-Wall Hold with Intention
Set up in a chest-to-wall handstand (facing the wall, belly side toward it). Apply both movements: first the PPT, rotate the pelvis and feel the lower back lengthen, then reach through the feet and extend fully through the quads. Notice whether your feet were already pointed or whether you were carrying some slack in the legs. Hold 20-30 seconds.
Drill 5: Kick-Up with Pre-Set
Before you kick up, set your PPT on the ground. Feel it in your standing leg, pelvis already in position. As the legs come overhead, continue reaching through the feet rather than letting it go. The goal is to arrive in the handstand already locked, not to search for the position once you're up there.
Drill 6: EOM Hold Against the Wall
In a wall handstand, deliberately bring both movements to their end ranges and hold. This is training the EOM Point directly, finding the exact position and teaching your nervous system to return to it. A few sets of 20-30 seconds of intentional holding will build more reliable position than ten minutes of distracted kicking up.
What You're Looking For
A clean lower-body position in the handstand looks like this:
- Pelvis posteriorly tilted, not neutral, not anteriorly tilted, not sliding behind the spine
- Legs completely straight, quads engaged and extended
- Feet pointed, reaching through the toes
- A sense of internal tension, not gripping or forcing, but two directions of energy meeting each other
When you get it right, the position holds itself. That's what you're looking for.
Yuval Oz
Hand balancer and handstand coach. Teaching people to get upside down - and stay there - since 2008.
Stay in the loop
Get new posts and updates
No noise. Just new articles, upcoming workshops, and things worth knowing.